Riding out the pandemic changed my relationship with the environment and food. I’m cooking more and spending lots of time in my yard!
Having a continuously productive fruit and vegetable garden makes me feel powerfully self-sufficient.
Here’s how I built my raised beds and the cost-effective, labor-saving method I used to fill them.
You’ll need the following to construct a 6′ by 3′ wood vegetable bed. Start building it in the morning, and you can have it planted by teatime.
Materials, Tools & Supplies
- 6–6′ long 2×6 and 6–3′ long 2×6 boards (fir is the least expensive, but cedar or redwood lasts much longer)
- 8 galvanized rigid tie corner brackets
- Pro Twist Modified Truss Screws: 1 box of #8 x 2 inch screws; 1 box of #8 x 1 inch screws; 4 x 2 ½” all-purpose wood screws (for the bottom corners)
- 1 bale of straw (Not hay. Hay has seeds)
- 1 bale of alfalfa
- 4–6 bags of compost (use homemade compost if you have some)
- Bone meal
- Cardboard (enough to cover two layers)
- Optional: Burlap as a biodegradable weed barrier (I use coffee bags)
- A power drill or screw gun.
- A chop saw or miter saw, or have your boards cut to size at the lumberyard.
Instructions for Building
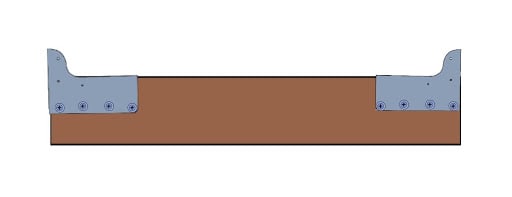
- Use the 1″ screws to hold the brace onto the face of the board, and the 2″ screws to pass through the brace and tie the perpendicular boards together at the corner.
- Repeat to create your second layer.
- On top of the second layer, place the boards for the last layer. Screw the brackets to this new layer, and then drive long screws at a diagonal to secure the boards together at each corner.
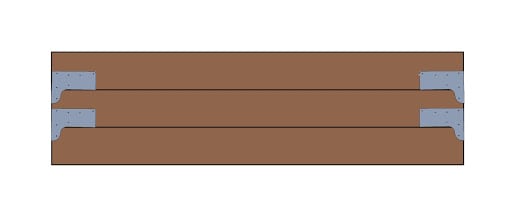
- Flip the two attached layers over. And affix the top layer
- Most vegetables need full sun for at least 8 hours a day. Place your box in a sunny spot. I built mine, 10 years ago, right on top of my lawn. No sod removal needed!
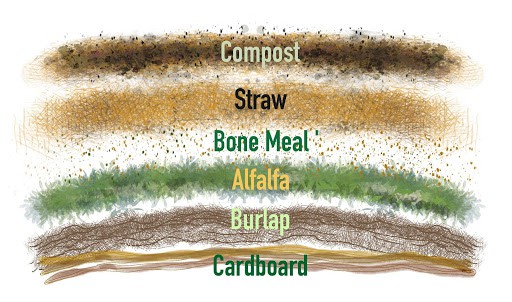
- Fill the bottom with two layers of cardboard (if you don’t have cardboard you can use newspaper) Remove any tape or labels.
- Add a layer of burlap.
- Untie your bale of straw. It will naturally break into sections that are about 6″ to 8″ thick pads. Stack 2 layers in the bed. Water well.
- Optional: add green garden clippings, kitchen waste (vegetables only) and dry leaves if you have them.
- Sprinkle the bone meal over the straw and garden waste.
- Pile on a layer of alfalfa using the same method as the straw layer.
- Water well.
Soil Preparation
The top layer is compost. Use enough to create a mound that is a bit higher than the top of the box. I use a combination of bought and homemade compost and a little of my yard’s soil.
My native soil is clay, and adding it helps my beds retain moisture during the dry months. The downside is that I usually have to pull a few weeds. Over time, all the layers will break down, and the soil will settle considerably.
Once you have at least 6 inches of compost, you’re ready to plant seeds or six packs of small starters.
For quick results, at this time of year, I recommend lettuce, kale, beets, and chard. You can also sprinkle a few radish or Japanese turnip seeds to harvest for a salad in a few short weeks. Sprinkle a few handfuls of loose straw as mulch.
The raised beds I built a decade ago have produced thousands of pounds of produce. Each year, I add a new layer of compost, and every now, and again I add layers of alfalfa, straw and bone meal. That’s it!
Start today, because nothing tastes better than homegrown vegetables! And in Southern California, you can grow them year-round for a continual bounty.
FAQs: Raised Bed Vegetable Gardening
Q: What vegetables can I grow in raised beds?
Almost anything: leafy greens like lettuce and kale, root vegetables like beets and radishes, as well as beans, tomatoes, peppers, and zucchini, among others.
Q: How deep should my raised bed be?
12 to 18 inches is ideal for most vegetables, providing enough space for roots to grow. However, if you plan on growing root vegetables, we recommend a deeper bed of at least 18 inches.
Q: Is a raised bed garden more expensive than traditional gardening?
There may be an initial higher cost for materials. But raised beds save money in the long run by reducing the need for chemical amendments, providing better drainage and soil quality, and extending the growing season.
Q: Can I use treated wood for my raised bed?
I advise against using treated wood, particularly older types treated with chemicals that may leach into the soil. Opt for untreated cedar or redwood, which are naturally resistant to decay.
Q: How often should I water my raised bed?
Watering frequency depends on weather, plant type, and soil moisture. As a general guideline, raised beds should be watered deeply at least once a week, increasing in frequency during hot, dry spells.
Q: Do I need to rotate my crops each year?
Crop rotation helps prevent soil depletion and reduces the risk of pests and diseases. Plan to rotate crops each year, moving related plants to different areas of the raised bed.
Q: How can I prevent weeds in my raised bed?
Using a layer of mulch like straw or bark can significantly reduce weed growth. Additionally, placing cardboard or landscape fabric underneath the soil can suppress weeds from below.
Q: What should I do if my plants aren’t thriving?
Check for signs of nutrient deficiency, pest issues, or inadequate sunlight. Testing your soil can help determine if amendments like compost or fertilizer are needed.
Q: Can I use a raised bed for perennial plants?
Raised beds can be an excellent option for perennial plants like strawberries, asparagus, and herbs. Just ensure the bed is adequately prepared and deep enough to accommodate their root systems.