
The spiral is one of nature’s most perfect forms.
Rose petals spiral out from the center of the bud. Seashells, galaxies, and hurricanes follow a breathtaking spiral pattern.
Spirals maximize space, resources, and distribution. The Fibonacci spiral governs the arrangement of leaves on a plant stem and seeds in a pine cone.
A spiral is also a superior layout for a tiered herb garden, especially if backyard space is tight.

The mathematical perfection of a golden spiral.
Benefits of a Spiral Herb Garden
- The spiral form lets you plant diverse herbs in a small area.
- Plants can be reached with less bending and stretching.
- A golden spiral makes a dramatic statement wherever you place it.
- A spiral garden retains moisture better and longer, which means less watering and healthier plants.
- A spiral garden’s tiered design facilitates the practice of growing mutually beneficial plants near each other.
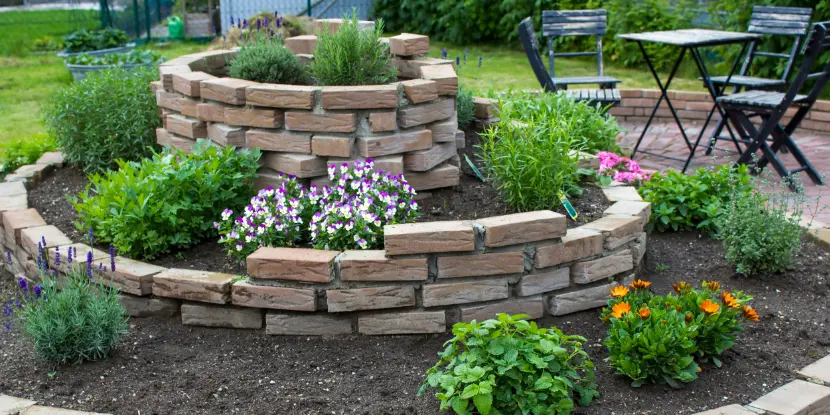
A spiral garden for herbs and flowers.
What You’ll Need
- Bricks or stones: These will form the walls of your spiral.
- Potting soil: Enough to fill the entire spiral.
- Compost: This will enrich the soil and provide essential nutrients for your herbs.
- Mulch: Mulch helps retain moisture and suppresses weeds.
- Shovel: To move soil and compost into the spiral.
- Gloves: Invest in a good pair to protect your hands from blisters and cuts.
- Mortar: This is optional, to reinforce your stacked bricks.
- Trowel: Also optional, to lay your mortar.

The exquisite beauty of a spiraling nautilus shell.
Building Your Spiral
- Most herbs need at least six hours of sunlight daily. The site should be sunny and level.
- Outline a spiral shape on the ground with a hose, rope, or string. You can make your spiral as small or large as you like, but aim for at least three feet in diameter.
- Lay bricks or stones along your marked spiral line, leaving enough space between each layer for soil and plants.
Building Up in Levels
- Begin at the outer edge of the spiral at ground level.
- Position bricks or stones along the marked spiral line, creating a low wall.
- (Optional) Secure the bricks or stones with mortar for stability.
- Fill the first layer with a soil and compost mixture before moving to the next level.
- Gradually elevate each successive layer of bricks or stones, overlapping the previous one for stability.
- Build up towards the center, using elevation to create varying moisture levels suitable for different herbs.
- Aim for a height of about 3 feet in the center of your spiral.
- Designate the top for herbs that need well-drained soil and the bottom for herbs that prefer more moisture.
- Use rocks, logs, or other found materials to fill in gaps.
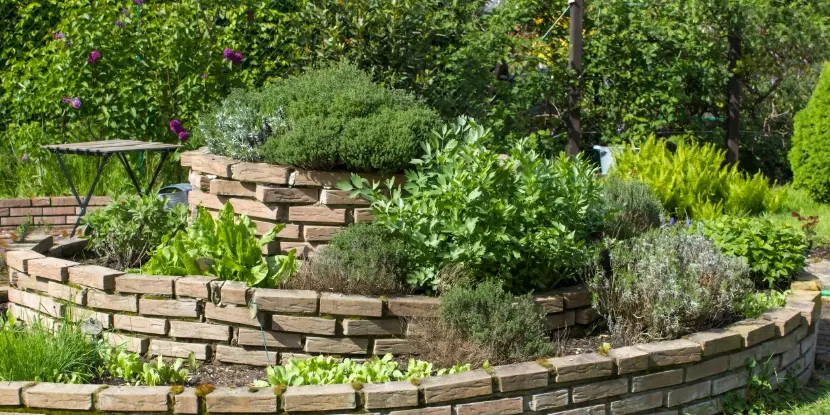
A large spiral garden for herbs and perennials.
Planting Tips for Your Spiral Herb Garden
- Choose a variety of herbs: An eclectic mix will add color and variety to your garden, attract beneficial insects, and repel harmful ones.
- Consider the direction of sun exposure: Place sun-loving herbs on the south or west side of the spiral and shade-loving herbs on the north or east side.
- Plant taller herbs in the center: This will prevent them from shading smaller herbs and give them enough room to develop.
- Follow companion planting guidelines: Companion plants can deter pests, improve the flavor, and boost the growth of other plants when cultivated nearby. For example, basil and tomato will enhance each other’s flavors.
Planting Your Herbs
- Add your potting soil to the herb garden.
- Mix in compost to enrich it.
- Before planting, arrange the herbs according to their moisture and sunlight needs. Herbs that prefer well-drained soil should be planted at the top, while herbs that thrive in moist conditions should be placed at the bottom.
- Make small holes in the soil deep enough to accommodate the root ball of each herb.
- Gently remove each herb from its container and place it into the prepared holes, keeping the top of the root ball level with the soil surface.
- After planting, water the spiral garden thoroughly to help the herbs settle and establish their roots.
- Apply a layer of mulch around the herbs to hold in moisture and suppress weeds.
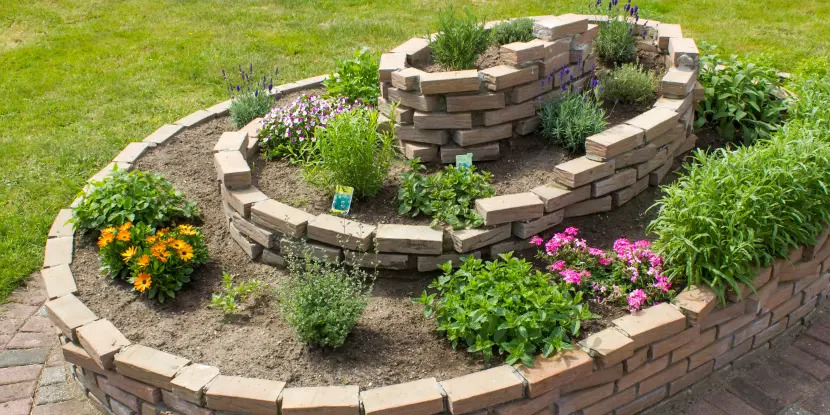
A spiral garden based on an ellipse.
Installing Irrigation (Optional)
- Select a drip irrigation kit: Choose a kit appropriate for the size of your herb spiral. Drip irrigation systems provide consistent moisture directly to the roots.
- Lay out the tubing: Starting from the top of the spiral, lay the main tubing along the layers and towards the bottom.
- Install emitters: Attach drip emitters to the tubing at intervals where you have planted herbs, placing one near the base of each plant.
- Connect to a water source: Attach the main tubing to a hose or outdoor faucet. Consider adding a timer to automate irrigation.
- Check for leaks: Turn on the water and inspect the system for leaks or weak points. Adjust the tubing or secure connections as needed.
- Secure tubing: Use stakes or clips to secure the tubing in place, especially on the steeper sections of the spiral. This will prevent movement and ensure even water distribution.
- Adjust water flow: Configure the drip emitters to provide the correct water flow for each herb. Some emitters may allow you to control the flow rate.
- Monitor and maintain: Regularly check the irrigation system. Clean the emitters periodically to prevent clogging and adjust the flow to match seasonal water requirements.
Maintaining Your Herb Garden
Follow these steps to keep your herb garden healthy and productive:
Watering
Water plants when the top inch of soil feels dry, typically once or twice a week, depending on climate and weather conditions.
Pruning
- Regularly pinch back the tips of young herbs to encourage bushier growth and prevent leggy plants.
- Harvest often to promote new growth. Always make clean cuts above a leaf node.
- Routinely check for and remove any dead, yellowing, or diseased leaves to prevent the spread of disease.
Fertilizing
Enrich the soil with organic compost or balanced fertilizer every couple of months. Avoid over-fertilizing, which can lead to excessive leaf growth and reduced flavor.
Mulching & Weed Control
- Apply a layer of organic mulch, like straw or wood chips, around the base of your herbs. Mulch helps retain soil moisture, suppress weeds, and regulate soil temperature.
- Immediately remove weeds that compete for nutrients and water.
Pest Control
- Check your herbs regularly for signs of insect damage or infestation.
- Encourage beneficial insect predators like ladybugs and lacewings by planting companion plants or installing insect hotels.
- Use organic insecticides, neem oil, or insecticidal soap for severe infestations. Hand-pick larger pests like caterpillars and beetles.
Disease Control
- Space plants to promote air circulation and lessen the risk of fungal diseases.
- Water the base of plants instead of overhead. Wet foliage can contribute to mildew and rot.
- Keep your garden clean. Promptly remove fallen debris and dead plant material.
- Rotate your herbs each season to prevent soil-borne diseases from taking hold.
Harvest herbs frequently to encourage new growth.
Best Herbs for a Spiral Garden
Experiment with different combinations of herbs to find what works best for your climate and personal preferences.
Top of the Spiral (Well-Drained Soil, Full Sun)
Middle of the Spiral (Moist Soil, Partial Shade)
Bottom of the Spiral (Moist Soil, More Shade)
- Mint
- Lemon Balm
- Tarragon
- Cress
- Watercress
Other Herbs to Consider
- Fennel
- Bay leaf
- Dandelion
- Chamomile
- Garlic chives
- Marjoram
FAQs: Building a Spiral Herb Garden
Q: How much space do I need for a herb spiral garden?
You can adapt an herb spiral garden to fit almost any space, but we recommend a minimum diameter of 3 feet.
Q: Can I build a spiral herb garden on a balcony or rooftop?
Yes, provided there’s adequate sunlight and structural support. You may have to use lighter materials or purchase a hanging spiral garden kit.
Q: Do spiral herb gardens require a lot of maintenance?
Generally, they need less maintenance than traditional garden beds. They require less water and tend to have fewer weeds.
Q: Can I use recycled materials to build my herb spiral garden?
Yes. Recycled materials like old bricks, stones, or wood can add character to your herb spiral garden.
Q: How often should I water my herb spiral garden?
The watering frequency depends on the climate and the herbs in your garden. It’s best to water when the top inch of soil feels dry, which may be once or twice a week. Herbs at the top of the spiral may require more frequent watering due to quicker drainage.
Q: What’s the best time of year to start planting a spiral herb garden?
Spring is the ideal time to start planting, allowing the herbs to establish their roots before the summer heat. You can also plant in late summer or early autumn if the plants have enough time to grow before the first frost.
Q: Can I grow perennial herbs in a spiral herb garden?
Perennial herbs like rosemary, thyme, and sage can flourish in a spiral herb garden if their root systems have enough space to spread.
Q: Can I grow herbs from seeds, or should I use seedlings?
Both methods are viable, but using seedlings provide a quicker start and easier establishment. Growing herbs from seeds demands more patience and care. If growing from seeds, follow the specific guidelines for each herb species.