
Choosing sandpaper feels small at first. Then you see a wall of numbers and the whole job starts feeling less clear. A lot of people hit that point. At Anawalt Lumber, this question comes up all the time from people fixing a chair, smoothing rough boards, or getting ready for stain. The good news is simple. Lower grit numbers cut faster. Higher grit numbers smooth more. Once you know that, the choice gets easier.
Anawalt Lumber always points people toward one basic rule. Match the grit to the stage of the job. Rough stock needs one kind of paper. Smoothing needs another. Final prep needs another. If you skip around too much, the wood often looks uneven. If you jump to a grit that is too fine too early, sanding takes longer and feels frustrating. That part gets old fast.
Contact Us

What Does A Sandpaper Grit Chart For Wood Mean?
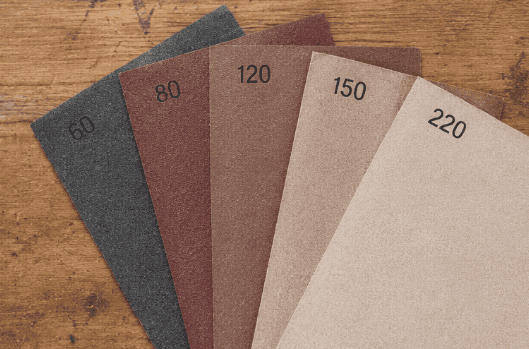
A sandpaper grit chart for wood shows how aggressive each paper feels. Coarse grit sandpaper for wood usually sits around 40 to 80. Medium grit sandpaper for wood often lands around 100 to 150. Fine grit sandpaper for wood often starts around 180 and goes higher.
Lower numbers remove more wood. Higher numbers leave a smoother face. That is the heart of a wood sanding grit guide. You do not need to memorize every number on day one. You only need to know the general pattern.
For sanding wood for beginners, a simple view works well.
- 40 to 80 for heavy removal
- 100 to 150 for smoothing
- 180 to 220 for finish prep
- 220 to 320 for light sanding between coats of finish
That basic chart saves a lot of guesswork.
What Grit Sandpaper For Wood Should You Start With?
What grit sandpaper for wood works best at the start depends on the condition of the surface. Rough lumber, old finish, glue spots, or deep marks call for a lower grit. A smoother board needs a gentler starting point.
Here is a practical way to think about the first pass.
- If the board feels rough and uneven, start around 80.
- If the board already feels fairly smooth, start around 100 or 120.
- If the wood already looks close to finish-ready, start around 150.
At Anawalt Lumber, we often tell people not to start too coarse unless the wood truly needs heavy cutting. A grit that is too rough leaves deep scratches. Those scratches take extra time to remove later. That slows the whole project down.
When Should You Use Coarse Grit Sandpaper For Wood?
Coarse grit sandpaper for wood works best when the surface needs real cutting. This includes sanding rough wood smooth, stripping old finish, flattening glue lines, or removing saw marks.
Coarse grits are common for:
- Rough framing lumber
- Old paint or finish removal
- Uneven edges
- Rounded glue squeeze-out
- Heavy weathered wood
A table top with deep finish build-up may start at 80. A rough pine board from a stack may start at 80 too. A hardwood panel with light machine marks may not need such an aggressive first step. That difference matters.
Sandpaper for furniture refinishing often starts with a coarser grit if the old surface is thick or patchy. Still, once the old finish is off, the next step should move upward. Staying on a low grit too long leaves scratches that show later under stain or paint.
Contact Us
When Should You Move To Medium Grit Sandpaper For Wood?
Medium grit sandpaper for wood is where shaping turns into smoothing. After the first rough pass, medium grit cleans up the scratch pattern and evens the face.
This range usually covers 100, 120, and 150. For many home projects, 120 is the grit that gets used the most. A lot of woodworkers land there often because 120 smooths well without feeling too slow.
Medium grit works well for:
- General surface prep
- Smoothing after 80 grit
- Softening rough edges
- Prepping wood before paint
- Prepping wood before final fine sanding
If you want the best sandpaper for wood during the middle stage, 120 is a strong place to start. For many boards, 120 gives a clean, even surface and sets up the next sanding step without much drama.
When Do You Need Fine Grit Sandpaper For Wood?
Fine grit sandpaper for wood works best near the end of the sanding process. This is where surface quality starts to matter more than material removal.
Fine grits often include 180 and 220. Some projects go higher, though many wood jobs stop around 180 or 220 before stain or paint. Wood finishing sandpaper grit depends on the final look you want and the product going on top.
Fine grit works well for:
- Final sanding before stain
- Final sanding before paint on trim or furniture
- Light smoothing between finish coats
- Touching up small raised grain areas
At Anawalt Lumber, people often ask for the final sanding grit for wood without being sure where to stop. For many common projects, 180 or 220 gives a smooth result without polishing the wood too much.
What Grit Sandpaper Before Staining Wood Works Best?
What grit sandpaper before staining wood works best usually lands around 150 to 220, depending on the wood species and the look you want. Many projects do well with 180 as a final step. Some go to 220 for a cleaner feel.
Sanding wood before staining matters because stain shows scratches. A board that looks fine before stain may suddenly show every missed mark after stain goes on. That part surprises people a lot.
A simple path for what grit sandpaper before staining wood often looks like this:
- 80 if rough
- 120 for smoothing
- 150 or 180 for prep
- 220 only if the wood and stain plan call for a finer finish
Wood species matters too. Softwoods often respond well to lighter final sanding. Dense hardwoods sometimes handle a finer grit better. Anawalt Lumber usually tells people to test stain on a scrap first. A quick sample saves a lot of regret.
What Grit Sandpaper Before Painting Wood Should You Use?
What grit sandpaper before painting wood depends on whether the wood is bare, already painted, or previously finished. For bare wood, many projects do well with 120 to 150 before primer. For old painted surfaces, the goal is often light scuffing, not heavy sanding.
This is a good range to remember.
- Bare wood before primer, 120 to 150
- Light scuff on old paint, 150 to 220
- Sanding between coats of primer or paint, 220 or higher
Paint hides some grain and color variation, though paint does not hide rough prep. Scratches, ridges, and dust bumps still show. A cleaner sanding step gives a cleaner paint job.
How Do You Sand Wood Properly With An Orbital Sander Or By Hand?
How to sand wood properly starts with steady pressure and a clear grit sequence. Do not jump from 80 straight to 220. Work upward in steps. That keeps the scratch pattern under control.
For orbital sander grit for wood, keep the sander flat and moving. Do not press down hard. Let the machine do the cutting. For hand sanding wood grit, wrap the paper around a sanding block when the surface is flat. A block spreads pressure more evenly and helps you avoid finger grooves.
A simple sanding routine looks like this.
- Start with the lowest grit the wood needs.
- Sand the full surface evenly.
- Vacuum or wipe dust away.
- Move to the next grit.
- Repeat until the surface matches your finish goal.
That process sounds basic because it is. Good sanding is often about patience more than tricks.
What Is The Final Sanding Grit For Wood And When Do You Sand Between Coats Of Finish?
The final sanding grit for wood often falls around 180 or 220. For sanding between coats of finish, many people use 220 to 320 with a light touch. The goal there is not heavy sanding. The goal is surface smoothing.
This step helps with:
- Dust nibs
- Raised grain
- Minor bumps
- Better next-coat bonding
At Anawalt Lumber, this is one of the easiest mistakes to spot. People sand too hard between coats and cut through the finish. A light pass works better. You are smoothing, not reshaping.
If you keep one thing in mind, let this be the one. Start as coarse as the wood needs, then move finer in clean steps. That approach works for rough boards, stain prep, paint prep, and furniture refinishing. Anawalt Lumber sees this every day. Good sanding usually comes down to the same simple habit. Use the right grit at the right time.
Contact Us